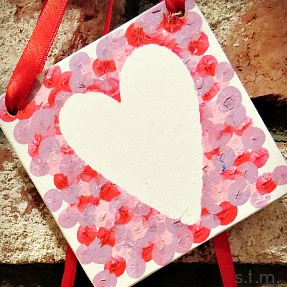
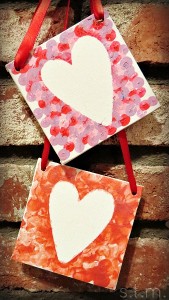
 There’s still time to make a little Valentine craft with your kids this year, and this easy child-friendly canvas and paint project may just be the ticket. With the aid of a few other moms and teachers, I helped sixteen preschoolers create their own fingertip heart prints yesterday at my son’s school party, and each child’s unique take on the project was a success. Some went with the dotting method, some picked the smearing approach, and then some just went all out freestyle; but they all used their fingertips to paint, and on the back of every canvas was this sweet saying I penned ahead of time:
I made this little heart with fingertips of mine,
just to say I Love You and Happy Valentine.
So here’s how we put this Valentine craft together.
Materials:
- 4×4 cardboard mounted canvas (I purchased mine at Michael’s, $4.99 for 4 plus a coupon discount)
- vinyl paper (or other material that will stick to the canvas. Note: contact paper did not work.)
- scissors or die-cutting machine
- hole-punching device (I used my Crop-a-dile)
- washable paint
- ribbon
- blow dryer (optional)
Instructions:
- Punch two holes at the top of your canvas board, one at each corner.
- Cut a heart out of the sticky paper using your scissors or die-cutting machine. I used my Cricut since I had to make so many.
- Peel the backing off the heart and stick it to the front of the canvas. Make sure you press down the edges well so that paint doesn’t seep under it.
- Using just a pointer finger, have your child paint the canvas. The idea is to make dots, but some children may not find this fulfilling, so freestyling may ensue. Whichever method makes your child happy, encourage him/her to paint completely around the heart, overlapping the sticker edges.
- Let the canvas dry. You can use a blow dryer to speed up the process.
- Pull off the sticky heart to reveal the white canvas under it.
- Write or print out and place the little fingertip rhyme above on the back of the canvas.
- Thread ribbon through the holes in the top of the canvas, tie knots and hang.
My son had such a good time making this Valentine craft that we just might make some more. After all, I do know a couple of grandparents who might like to have their own.

